Turn Borders
Tribute Site


HO Slot Car track manufacturers all provide guard rails that can be attached to the edges of their track. Unfortunately these guard rails must be attached directly to the outside edges of straights and turn sections, giving the outside lane's car a distinct advantage. A driver in the outside lane can simply lean on these guard rails and negotiate the turn at a much higher rate of speed than the opponent on the inside lane.

Many racers choose to build outside turn borders to eliminate the inherent advantages of guard rails placed on the edges of corners. Along with providing a more fair racing experience, these turn borders or curbs can be quite attractive and lend a bit of authenticity to the racing layout.

Turn Borders Installed on a Hairpin Turn


HO Slot Car track is approximately ¼" thick. The borders should be made of a material the same thickness as the track itself, to prevent cars in the outside lane from tripping on the border when their rear tires drift to the outside of the turn and on to the border itself.

Painted Track Aprons on a 4-Lane Model Motoring Layout


Aurora Model Motoring Thunderjets drift much more than modern slot cars with their strong traction magnets, so turn borders are essential on all your turns to keep the racing fair.

While turn borders are not really that difficult to make yourself, if you'd prefer to buy pre-made borders see the HO Track Borders section at the end of this page.


Turn Exit Easements

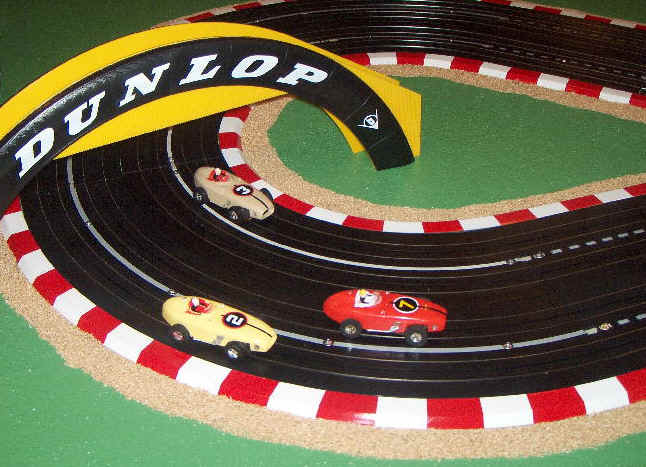
A portion of the track following a turn should also have a border. A drifting car requires a few inches following a turn to right itself. If your race track is to be run in both directions then you will want to add borders both before and after a turn so that regardless of the direction of travel an apron will always follow a turn.

Straight Easements Following a Turn


On twisty section of the raceway where left- and right-hand turns follow one another you will also need to have an easement area following the initial turn in order to keep the cars from dropping off of the edge of the track.

Turn Easements Through a Chicane


Modern HO slot cars with strong traction magnets will only need a few inches of border following a turn, but older Aurora Model Motoring Thunderjets and A/FX chassis will require as much as 6-9 inches of additional border area after a turn to keep the car from falling off of the edge of the track.


Materials

Two materials are commonly used to create turn borders; Foam-Core display board and Masonite hardboard. Both of these materials are available in sheet form and can be found in ¼" thicknesses.

Foam-Core display board is available at most art stores and office supply houses. It is normally sold in 2x3 or 3x4 foot sheets. Foam-Core boards ¼" thick are needed to build track borders. This material is made by sandwiching a layer of dense Styrofoam between two thin layers of poster board. Foam-Core is available in many different colors, but for HO Slot Car track borders white is the best choice.

Foam-Core can easily be cut using a standard Exacto knife, and its white poster board finish makes it easy to use your actual track as a template when tracing an outline.

Masonite hardboard can also be used to make HO track borders. It can normally be found at most building supply stores, lumber yards and larger hardware stores. It's commonly available in 4x8, 4x4 and 3x4 foot sheets.

Masonite hardboard is usually chocolate-brown in color and can easily be cut with an electric saber saw.

If you would prefer to purchase pre-made turn borders I am now selling molded aprons in the HO Track Borders section at the bottom of this page.

The picture below shows how these molded aprons can be painted to create a very attractive FISA curb.

Painted Turn Border


Layout Templates

With either material, the easiest way to layout your cutting guides is to place the track directly on top of the board and then trace the outside edge with a regular No. 2 lead pencil. HO scale track borders should be at least ¾" wide. A second cutting line will need to be drawn outside of this first line if the border being made is for an outside turn. Borders for inside turns will require a second cutting line inside the first.

Most art stores and building supply houses sell a carpenter's beam compass that is ideal for laying out this second cutting line.

It's important to extend the track borders beyond the curve itself by at least 6" to 9". A drifting car will normally require several inches of straight track after a turn to right itself again. If your HO Slot Car track layout is designed for racing in either direction then you'll need to extend the turn borders both before and after the curve.


Gluing Track Joints

This next step is optional, but will make laying out your turn borders much easier, and also provide for a smoother running race track. HO Slot Car track normally snaps together and is fastened at the joints with small plastic retaining tabs. These tabs can be glued to better keep the sections squarely joined. If you elect to glue track sections together assemble the various turn sections comprising each turn on a flat smooth surface first.
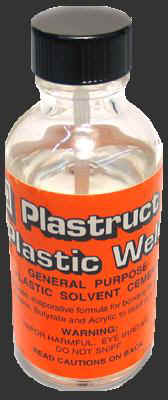
Check all of the track joints and rail connections before you actually glue the track together. You may also want to include the straight section after a corner in this assembly. Once you are certain that the track joints are smooth and that the power rails are even carefully disassemble the track, gluing one set of tabs at a time and reconnect the track together.

Plastruct Plastic Weld Most hobby shops sell a product call Plastruct Plastic Weld. This is a solvent-based product that when applied to two adjoining pieces of plastic will actually melt, or weld them together. After gluing sections together let them cure overnight for a strong bond.

Once a turn section has been glued set it aside and repeat the process for each turn on your layout. When you've completed this phase of the operation you should have fully assembled turn sections for all of the various turns in your layout.


Soldering Power Rails

This next step is also optional, and should only be attempted if you have glued your track sections together as described above. The weakest link in power delivery on longer HO Slot Car tracks are the joints at each track section. Soldering the power rails at each of these joints will make a better electrical connection and allow power to flow more evenly around the entire racing circuit. See the Soldering page for more information and to purchase the proper tools and supplies for soldering track rails.

The original Aurora Model Motoring and Snap-Lock track has rail connections that can not easily be soldered. However the Tomy AFX and Mattel/Tyco track systems can be soldered quite easily.

Soldering the power rails will also make for a smoother running race track. You will need a good quality soldering iron that produces enough heat to quickly join the power rails. You Must Only use soldering flux and solder that is specifically designed for electrical connections. This is very important. Acid based soldering products used to solder rain gutters and most stained glass materials Must Not be used. Check the labels on these products, they will clearly state their intended purpose. Liquid or paste soldering flux that comes in a small squeeze tube is best.

In the previous phase of construction you glued each curve section into a single turn element comprised of track sections making up a particular corner on your race track. These corner elements that you previously created can now be soldered.

The soldering steps described below should be practiced first on scrap track sections. Try soldering the power rails on several scrap sections to get the hang of it before you attempt to solder your actual track.

Place the turn section that you're working with on a flat smooth surface and put a small dab of soldering flux on each power rail joint to be soldered. You must use soldering flux first, do not attempt to solder bare metal power rails. Soldering flux has a cleaning component in it that will prepare the metal rails for the application of solder and allow the heated solder to flow evenly throughout the joint. A well made solder joint will have a shiny silver appearance. If the joint is dull colored or the solder is not flowing freely this usually means your soldering iron is not hot enough.

Place your soldering iron directly on a single power rail joint and allow it to heat the soldering flux and metal rails sufficiently before applying solder. Let the solder flow around the entire joint and then gently remove the iron and let the joint cool naturally. Do not blow on heated solder as this will fracture the joint. Move your soldering iron to the next power rail joint and repeat this process until you have soldered all of the joints in the entire turn component.


Cutting Out Borders

Once you've traced cutting lines using the actual track as a template or a beam compass, it's time to cut out the borders.

If you decided to use Foam-Core for your track's borders you can easily cut them out using a standard Exacto knife. Don't try to cut through the material all in one knife pass though. First score along the lines you've traced. Make several passes and let the knife do the work. Once the display board has been cut you can then cut the Styrofoam layer and follow up by cutting the other side's display board.

If you are using Masonite hardboard for track borders you can cut them out using a saber saw with a fine-toothed blade designed specifically for hardboard.

With your track borders cut from either material you can now sand the edges to smooth out any cutting marks that may remain.


Painting The Borders

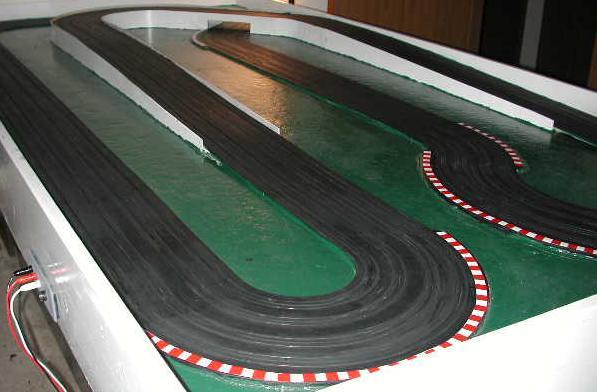
Foam-Core track borders need to be masked using ½" 3M Masking Tape. Place the tape widthwise at ½" intervals to create striped borders. With the masking tape applied, paint the borders using red enamel spray paint. After the red paint has dried, carefully remove the masking tape to reveal the white sections of the track borders. Your track borders are now ready for installation on your racetrack.

Masonite hardboard on the other hand is very porous, and will absorb a large amount of paint. Prime the entire border before painting using a good quality enamel primer. After priming the surface paint the entire border using white enamel spray paint and then set them aside to dry thoroughly. Masonite hardboard borders will also need to be masked using ½" 3M Masking Tape. Place the tape widthwise at ½" intervals to create striped borders. With the masking tape applied paint the entire border using red enamel spray paint. After the red paint has dried carefully remove the masking tape to reveal the white sections of the track borders.


FISA Curb Tape


If you would prefer not having to paint and mask your borders a FISA Curb Tape Kit is available to make the job a simple matter of applying pre-cut tape.


Installing The Borders

Your HO Slot Car track borders are now ready for installation on your racetrack. If you glued and soldered your layout's corner sections then arrange these on your table and join them together with the connecting straights. You can repeat the gluing and soldering operations on your track's straight sections as well, but lay the entire track out first. Most HO Slot Car track designs require slight adjustments to make the entire track line up.

Use a small amount of glue to fasten the borders to the table top, or short finishing nails. If you use finishing nails drive them into the red painted sections of your borders and then touch up the nail heads with matching red paint.


HO Track Borders

HO Turn Border material is now available! These borders are molded using Black Neoprene Rubber and can easily be wrapped around the outside or inside of any turn radius size. They are exactly the same height as HO track, so they can be used to create a smooth apron. See the Landscaping section for pictures of these borders applied to an actual racetrack.

The borders are black in color to match the track itself, but they can be painted if you wish to create a contrasting edge or red and white FISA-style curbs. A FISA Curb Tape Kit is also available which includes ½" wide White Tape and pre-cut ½" Red Tape Squares.

The illustration below shows a cross section of the border material and the overall dimensions.

HO Turn Border Cross Section


Note: The borders are designed to be used with tracks mounted on a table. They will not work with tracks that are setup temporarily on the floor. They need to be glued or nailed to a tabletop.

You can purchase these turn borders in 3, 4 and 5 foot lengths or in continuous rolls of 20 feet or more.


  HO Track Border Sample $0.75 Temporarily Out of Stock
  3 Foot HO Track Border $6.79 Temporarily Out of Stock
  4 Foot HO Track Border $8.99 Temporarily Out of Stock
  5 Foot HO Track Border $10.99 Temporarily Out of Stock
  HO Track Border (20 Foot Minimum) $1.99 Temporarily Out of Stock

Note: When ordering continuous rolls of HO Track border material you must enter a Shopping Cart Quantity of 20 or More feet!


  FISA Curb Tape Kit (27 Feet) $22.99 Temporarily Out of Stock


Copyright © 1999-2019 by HO Slot Car Racing. All Rights Reserved.

No part of this web site may be reproduced or transmitted in any other form or by any means for commercial use without the prior written permission of HO Slot Car Racing.

Page last updated on 21-Dec-2019
Home


Print