Soldering Tips
Tribute Site |
|
|
|
|
|
|
| Modular Handle |
|
|
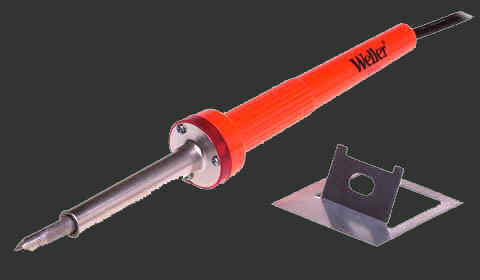
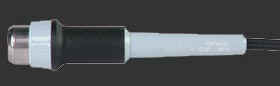 The Weller
Cool-Grip Handle is an excellent value. This handle is designed to
accept a number of different thread-in heating elements.
The Weller
Cool-Grip Handle is an excellent value. This handle is designed to
accept a number of different thread-in heating elements.|
|
|
|
| Modular Heating Element |
|
|
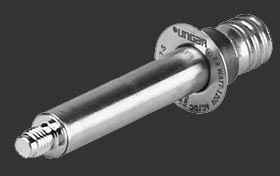 The Weller
45-Watt Heating Element is a good choice for general purpose soldering
operations. A 25 and 35 watt heating element are also available, but for
track wiring chores the 45-watt model is recommended.
The Weller
45-Watt Heating Element is a good choice for general purpose soldering
operations. A 25 and 35 watt heating element are also available, but for
track wiring chores the 45-watt model is recommended.|
|
|
|
| Modular Soldering Tip |
|
|
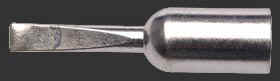 For soldering track power rails you'll need a Chisel tip, not the Pencil style which tapers to a point.
|
|
|
|
| Combination Heater & Tip |
|
|
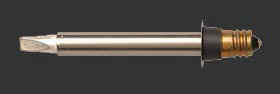 Weller also makes a 45 Watt Thread-In Heater with an integral Chisel tip that's a full 1/4" in width.
|
|
|
|
| Soldering Stand & Tip Cleaner |
|
|
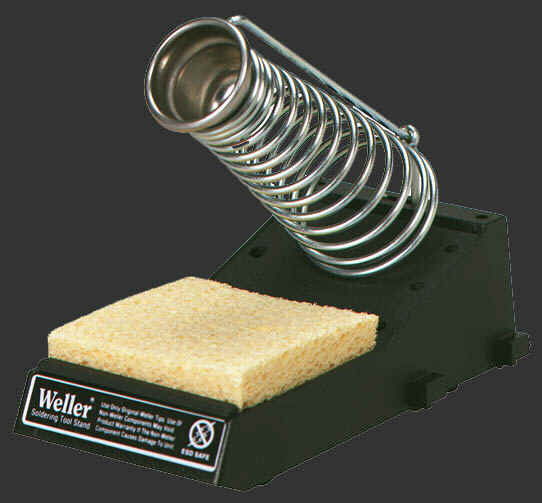 Weller has a
Soldering Iron Holder and Tip Cleaner as well. This item is highly
recommended. Not only will it provide a safe place to set your hot
soldering iron, but more importantly, it also includes a tip cleaning
sponge.
Weller has a
Soldering Iron Holder and Tip Cleaner as well. This item is highly
recommended. Not only will it provide a safe place to set your hot
soldering iron, but more importantly, it also includes a tip cleaning
sponge.|
|
|
|
| Budget Soldering Kit |
|
|
 Weller has a
soldering iron kit for the budget minded hobbyist that includes a 40
Watt heater/handle, 1/4" Chisel tip and small stand. The tip is
replaceable, but the heater itself is not.
Weller has a
soldering iron kit for the budget minded hobbyist that includes a 40
Watt heater/handle, 1/4" Chisel tip and small stand. The tip is
replaceable, but the heater itself is not.|
|
|
|
| Soldering Tools |
|
|
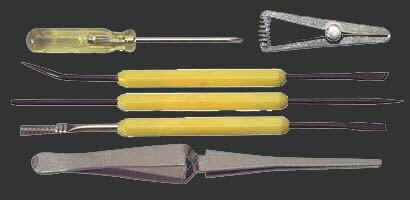 A set of
soldering tools makes most soldering tacks much easier. A good set will
include several pointed tools for holding wires, along with clamps and
heat sinks.
A set of
soldering tools makes most soldering tacks much easier. A good set will
include several pointed tools for holding wires, along with clamps and
heat sinks.|
|
|
|
| Solder & Flux |
|
Solder and flux come in two distinct varieties; rosin core and acid core. Use only rosin core soldering products for electrical connections. The labeling on the package will clearly state if the soldering product is designed for electrical work. Acid based soldering products are normally used for plumbing, rain gutter repairs and stained glass work. These acid core types of solder must not be used for electrical work. |
| Tinning The Tip |
|
The tip of your soldering iron needs to be tinned before it's used. Tinning is the process of coating the tip itself with solder. Heat your soldering iron up for the first time and then apply solder directly to the tip. The solder should melt and flow easily over the tip. Wipe any excess solder off by running it over the moistened tip cleaning sponge. Repeat this process several times until the tip is a shiny silver color. |
| Soldering Wires |
|
Soldering all of your slot car track's wire connections will guarantee good electrical connections. A good electrical connection starts with clean materials and a good mechanical connection first though. If you are connecting a wire to a terminal strip or another piece of wire make a good strong mechanical connection first by crimping the wire with a pair of needle-nosed pliers. |
|
Good soldering technique involves heating the work to be soldered sufficiently to melt the solder and allow it to flow easily over the material being soldered. |
| Soldering Power Rails |
|
Your slot car track's power rails can also be soldered. Soldered power rails will allow electrical current to flow more evenly around the entire racing circuit, and also provide for a smoother running race track. The power rail connections at each track section joint will need to be soldered. |
| Silver-Plated Pickup Shoes |
|
You can also improve the performance of your HO slot cars by tinning the pickup shoes with silver solder. Silver solder is available at most hardware stores and hobby shops. Silver solder however has a higher melting point than does normal lead/tin solder, so make sure you heat the pickup shoes sufficiently before tinning them. |
| Shunted Pickup Shoes |
|
Another way to improve your slot car's performance is to solder short flexible shunt wires directly to the rear of the pickup shoes and also to the motor's brush connectors. HO slot car pickup shoes normally conduct electricity to the motor via a mechanical hinge connection at the rear of the pickup shoe itself. |
| Practice Soldering |
|
If you're new to soldering, take the extra time and practice soldering scrap wires before attempting to solder your track's wiring or slot car parts. Soldering is not difficult, but if you're just starting out, practicing your newly acquired skills on unwanted items will assure that you don't damage your track or cars. Once you feel comfortable handling a soldering iron you can move on to the examples described above. |
|
|
|
|
Weller Soldering Iron Handle | $27.99 |
|
|
|
Weller 45 Watt Heating Element | $36.99 |
|
|
|
Weller 1/4" Thread-On Chisel Tip | $8.99 |
|
|
|
Weller 1/4" Heavy Duty Chisel Tip | $10.49 |
|
|
|
Weller 45 Watt Heater w/ Tip | $55.99 |
|
|
|
Weller Soldering Stand & Cleaner | $42.99 |
|
|
|
|
|
Weller 40 Watt Budget Soldering Kit | $29.99 |
|
|
|
Weller Budget 1/4" Replacement Tip | $13.99 |
|
|
I also stock the Weller Budget Soldering Iron Kit that includes a 40 Watt Heater in the handle, a 1/4" Chisel Tip and Stand. |
|
|
|
|
Weller 80 Watt Budget Soldering Kit | $46.99 |
|
|
|
Weller Budget 3/8" Replacement Tip | $14.99 |
|
|
This 80 Watt soldering iron is designed for scratch-building brass slot car chassis only and should not be used for electrical track work. |
|
|
| Soldering Flux Paste (2 Oz. Tub) | $12.99 |
|
|
|
Solder 60/40 .031" - 1 Pound Spool | $35.99 |
|
|
|
Six Piece Soldering Tool Kit | $5.99 |
|